Your cart is currently empty!
Arum and Calla Lilies: Will They Recover from Fertilizer Burn? Signs and Symptoms and How to Fix It


So, you’ve noticed your arum and calla lilies are struggling a little bit. Think your lilies have fertilizer or nutrient burn? Maybe you were a little heavy-handed when applying fertilizer. Now you want to know how bad is nutrient burn. Will your lilies recover? Don’t worry, we have all the information you need here.
Below, we’ll discuss nutrient burn, list some of the early signs of nute burn, and talk about if your lilies will recover from it.
What is nutrient burn? Is it the same as fertilizer burn?
Nutrient burn is a common problem growers experience with their plants. It happens when a plant is fed too much fertilizer, when applying soluble fertilizer too often, when drainage of media is poor, or when growing in dry conditions, among other things. This causes plant damage. It’s also referred to as nute burn or fertilizer burn.
How bad is nutrient burn?
Over-fertilizing your lilies with nutrients can negatively impact growing productivity and hence your profitability. It happens because plants are not equipped with the ability to discard excess nutrients. They cannot handle overfeeding. Therefore, it’s essential for you to regularly monitor your lilies for early signs of nutrient burn.
What are the early signs of nute burn?
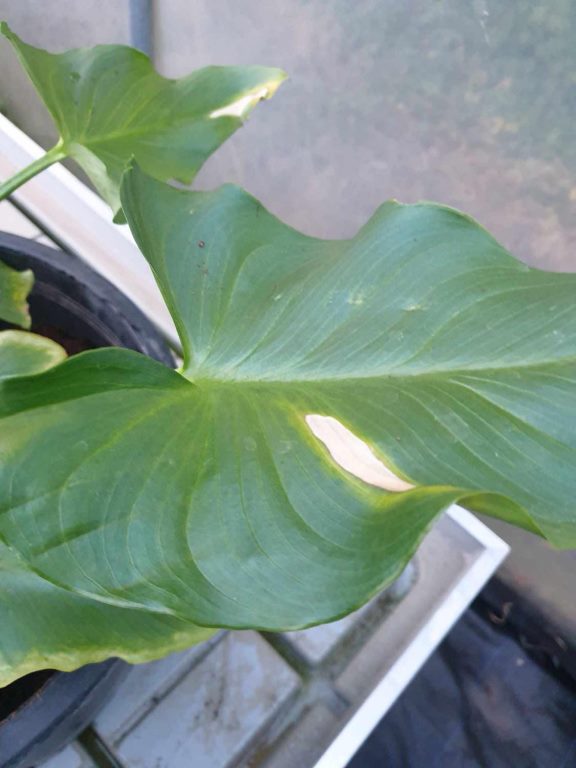
What does nutrient burn look like? Here are some of the early signs and symptoms:
- Leaves bending at the tips
- Deep green coloring of the leaves
- Slight brown or yellowing at the tips of leaves
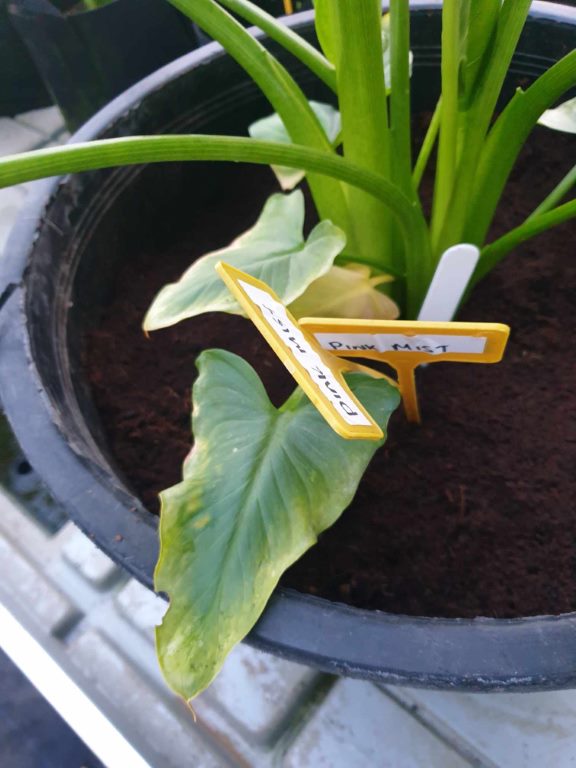
These are the early signs. But there are also more advanced symptoms to watch out for:
- Twisting leaves
- Leaves wilt or curling under
- Brown or yellowing moving up the leaf
- Very slow growth
Generally, fertilizer burn starts at the tip of the leaf and works its way back toward the plant. Plants move nutrients through branches to leaves and when it has nowhere left to go (when there is too much fertilizer) it starts to burn the tips.
To prevent and manage overfeeding, use the application rates stated on the labels and regularly measure soluble salt levels in the media.
There can be some confusion between nutrient burn and other potential issues. Some may question if the issue is nutrient burn or something else. For example, how can you tell the difference between potassium deficiency and nutrient burn? Potassium deficiency and nutrient burn are often mistaken for each other. Often the first signs of the issue look just like nutrient burn. However, you’ll know the issue is potassium related when the leaves turn yellow in the margins, primarily near the burn edges.
Will plants recover from nutrient burn?
If your lilies do in fact have a nutrient burn, don’t panic. If you catch it early on, you can remedy the issue and save your plant. But unfortunately, you’ll still lose the parts of your plant that have been burned. You’ll need to cut those areas out of the plant.
Related to this, many people often ask if you can reverse fertilizer burn. No, you cannot reverse nutrient burn. The parts of your lilies that have turned brown will never turn green and be healthy again.
How long does it take a plant to recover from fertilizer burn?
If you’ve overfed your lilies, the first thing you’ll need to do is stop feeding them. Continuing the fertilization will only prolong the issue and it could even kill your plant. Be sure to remove excess fertilizer and flush out excess with water. You may even need to replant in new soil if the soil is over-saturated with fertilizers.
How long it will take your lilies to recover will depend on the plant. It generally takes a couple of weeks to recover. Keep a close eye on your plants and look for signs of recovery.
Prevention is always the best cure when caring for your lilies. Make sure you fertilize your plants based on their specific needs. Water-soluble fertilizers can help in this area.
Testing Growth Media with pH and EC Pens
Greenhouse growth media are tested by extracting the sample with distilled water and measuring the pH and EC of the filtered extract. Here’s how you do it:
Supplies
In addition to the pens, the following items are needed:
- pH 4 and 7 buffer solutions to calibrate the pH pen (greenhouse supply).
- EC standard solution to calibrate EC pen (greenhouse supply).
- Plastic funnel (12-15 cm top diameter) (grocery).
- Distilled water (grocery).
- Basket-style coffee filters (grocery).
- Clean 450 ml or 1 litre wide mouth jars (home).
- 90 ml waxed paper cups (grocery).
- Plastic colander (15 cm diameter minimum) (grocery).
- Shallow baking pan (grocery) or 20-25 cm diameter plant saucers (greenhouse supply).
Growth Medium Sampling
Sampling should be done from the root zone, not the surface. The surface often has the highest nutrient and soluble salt levels, which do not represent the fertility status of the root zone. Sampling is also a good time to inspect the roots, as a small or diseased root system can often explain fertility problems. Air-dry the sample at room temperature or below 27°C. Spread the sample out in the baking pan or plastic saucer and remove any large pieces of root and other debris. Unless the sample is very wet, it should be dry enough in 24 hours to test. Screen the sample using the colander or similar sieve. The screened sample is ready to test.
Extraction Procedure
The extraction procedure described here is known as the “1:2 dilution method.” Follow these steps:
- Combine one volume of air-dried growth medium with two volumes of distilled water. For example, fill one 90 ml cup with growth medium and two 90 ml cups with distilled water and mix them together in the 450 ml jar.
- Mix the sample and distilled water thoroughly by swirling the jar and then allow it to stand for 30 minutes.
- After 30 minutes, pour the mixture into the funnel supporting the coffee filter. Catch the filtered extract in another clean 450 ml jar. The objective is to separate the liquid extract from the solids, which are discarded. The extract is now ready to test for pH and EC.
- Properly calibrate pens.
- Pour enough extract into a clean 90 ml cup so that the sensor of the pen will be completely immersed in the extract. Swirl the pen in the extract to dislodge any air bubbles and then leave the pen still until a stable (unchanging) reading appears. The stable pH or EC reading is your result.
A Second Method to Test: Runoff Testing
For arum and calla lilies, runoff testing is an effective method to measure the pH and EC of the growing medium. Here’s how you do it:
- Prepare to test by gathering a suitable amount of distilled water. For a 7.5-litre pot, approximately 4 litres of distilled water will be needed.
- Begin by slowly pouring the distilled water into the pot until water starts to drain from the bottom. Collect this initial runoff and measure the pH and EC immediately. This initial reading is often the most accurate indicator of the soil pH.
- Continue to pour water into the pot, stopping at intervals (such as after 2 litres and then again after the full 4 litres) to take additional measurements of the runoff.
- If the initial pH reading is low (below 5.5), adjust the watering solution to a higher pH (around 6.8-7.0) and continue the process until the runoff is within the desired range of 5.8-6.2 for arum and calla lilies.
- If the initial pH reading is high (above 6.5), monitor subsequent readings, as the pH is likely to stabilize as the plant absorbs nutrients.
For arum and calla lilies, the pH should be maintained between 5.5 and 6.5, and the EC should be between 2.0 and 3.0 dS/m. Regular monitoring and adjustment based on these readings will help ensure the healthy growth of your lilies.
Adjusting pH and EC Levels
To address nutrient burn or nutrient lockout in arum and calla lilies, adjusting the pH and EC of the growing medium is crucial. Here’s how to do it:
- Lowering EC: If the EC of your runoff is too high, flush the growing medium with pH-adjusted water (within the range of 5.8-6.2) to help bring down the EC. Continue to flush until the runoff EC matches the desired range of 2.0-3.0 dS/m.
- Raising EC: If the EC is too low, you can increase it by adding a water solution with the desired EC rating. Carefully monitor the runoff and adjust until it reaches the appropriate level.
By regularly measuring and adjusting the pH and EC in your growing medium, you can effectively manage and prevent nutrient burn and nutrient lockout in your arum and calla lilies. This proactive approach ensures your plants remain healthy and vibrant.
Looking for services in Kill? You may also like: Flower Delivery 24 | Log Cabins Ireland.
Our Shop
-

Crowborough — Zantedeschia aethiopica ‘Crowborough’
-

Green Goddess — Zantedeschia ‘Green Goddess’
-

Hercules — Zantedeschia aethiopica ‘Hercules’
-

Highveld — Zantedeschia ‘Highveld’
-

Odorata — Zantedeschia odorata
-

Pink Flamingo — Zantedeschia ‘Pink Flamingo’
-

Pink Mist — Zantedeschia ‘Pink Mist’
-

White Giant — Zantedeschia aethiopica ‘White Giant’
Leave a Reply